The above error occurs even though you have an active internet connection and the error itself doesn’t give proper information about the error. But after searching around a lot these are the possible cause of Aw, Snap! Error:
Temporary Website Unavailability from the Server Incompatible or corrupted Chrom Extensions Malware or virus infection Corrupted Chrome profile Outdated Chrome version Firewall Blocking Websites Bad or damaged Memory Sandbox mode
Now, these are the possible causes that seem to create the Aw, Snap! error on Google Chrome. In order to fix this error, you need to troubleshoot all the above possible causes because what might work for one user might not work for another. So without wasting any time let’s see how to actually Fix Aw Snap Error on Chrome with the below-listed troubleshooting guide.
15 Ways to Fix Aw Snap Error on Google Chrome
Make sure to create a restore point just in case something goes wrong.
15 Ways to Fix Aw Snap Error on Google Chrome Method 1: Reload the Website Method 2: Reboot your PC Method 3: Clear Chrome Browsing History Method 4: Disable Apps and Extensions Method 5: Reset Chrome to Factory Settings Method 6: Update Google Chrome Method 7: Change Privacy Settings Method 8: Disable Hardware Acceleration Method 9: Run CCleaner and Malwarebytes Method 10: Run Windows Memory Diagnostic Method 11: Temporarily Disable Antivirus and Firewall Method 12: Use Google Chrome Offical Cleanup Tool Method 13: Create a New User Profile for Chrome Method 14: Disable Sandbox mode Method 15: Reinstall Chrome
Method 1: Reload the Website
The easiest fix for this issue is reloading the website which you were trying to access. See if you’re able to access other websites in a new tab and then try to again reload the web page which is giving the “Aw Snap error“. If the particular website is still not loading then close the browser and again open it. Then again try to visit the website which was earlier giving the error and this may be able to resolve the issue. Also, make sure to close all the other tabs before trying to reload the specified web page. As Google Chrome takes a lot of resources and running many tabs at once may lead to this error.
Method 2: Reboot your PC
While many issues in PC can be fixed by simply restarting your PC, so why not try the same for this issue. “Aw Snap” error seems to fix by simply restarting your device but this method may or may not work for you depending upon your system configuration.
Also, if you’re still not able to load the website then try using another PC or your friend’s PC to check if they also face a similar issue while accessing the same web page. If this is the case then no need to worry, as the issue is related to the server-side and you can simply relax until the issue is fixed by the website administrator.
Method 3: Clear Chrome Browsing History
Open Google Chrome and press Ctrl + Shift + Del to open History.
Or else, click on the three-dot icon (Menu) and select More Tools then click on Clear browsing data.
Check/tick the box next to Browsing History, Cookies, and other site data and Cached images and files.
Click on the drop-down menu next to Time Range and select All time.
Finally, click on the Clear Data button.
Close your browser and restart your PC.
Method 4: Disable Apps and Extensions
Click on the menu button and then More Tools. From the More Tools sub-menu, click on Extensions.
A web page listing all the extensions you have installed on your Chrome browser will open up. Click on the toggle switch next to each one of them to turn them off.
Once you have disabled all the extensions, restart Chrome and check if you’re able to fix Aw Snap error on Chrome.
If it does, the error was caused due to one of the extensions. To find the faulty extension, turn them on one by one and uninstall the culprit extension once found.
Method 5: Reset Chrome to Factory Settings
Open Chrome Settings scroll down to find Advanced Settings and click on it.
Under Reset and clean up, clean on ‘Restore settings to their original defaults’.
In the pop-up box that follows, read the note carefully to understand what resetting chrome will transpire and confirm the action by clicking on Reset Settings.
Method 6: Update Google Chrome
Open Chrome and click on the ‘Customize and control Google Chrome’ menu button (three vertical dots) at the top right corner.
Click on Help at the bottom of the menu, and from the Help sub-menu, click on About Google Chrome.
Once the About Chrome page opens, it will automatically start checking for updates, and the current version number will be displayed below it.
If a new Chrome update is available, it will be automatically installed. Just follow the on-screen instructions.
This will update Google Chrome to its latest build which could help you fix Aw Snap Google Chrome Error.
Method 7: Change Privacy Settings
- Again open Google Chrome and then open Settings.
- Scroll down till you find the Privacy and Security section.
- Now under Privacy and Security make sure the following options are checked or turned ON:
Use a web service to help resolve navigation errors Use a prediction service to help complete searches and URLs typed in the address bar Use a prediction service to load pages more quickly Protect you and your device from dangerous sites Automatically send usage statistics and crash reports to Google
- Restart Google Chrome and see if you are able to Fix Aw Snap Error on Google Chrome.
Method 8: Disable Hardware Acceleration
First, launch the Google Chrome browser and click on the three dots available on the top right of the browser window.
Now go to the Settings option and then Advanced Settings.
You will find the ‘Use hardware acceleration when available’ option in the System column in the Advanced Settings.
Here you have to turn off the toggle to disable the Hardware Acceleration.
Restart Chrome and this should help you in fixing Aw Snap Error on Chrome.
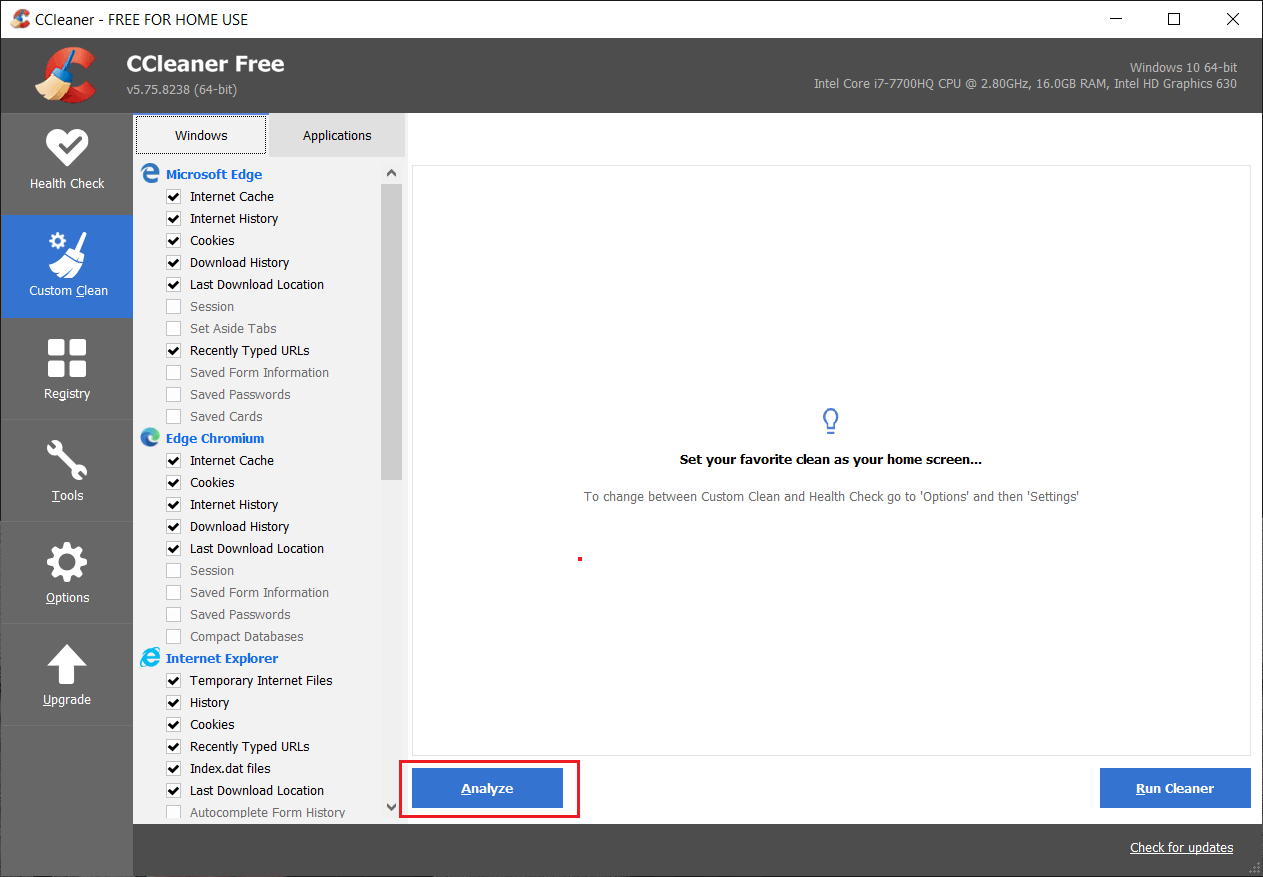
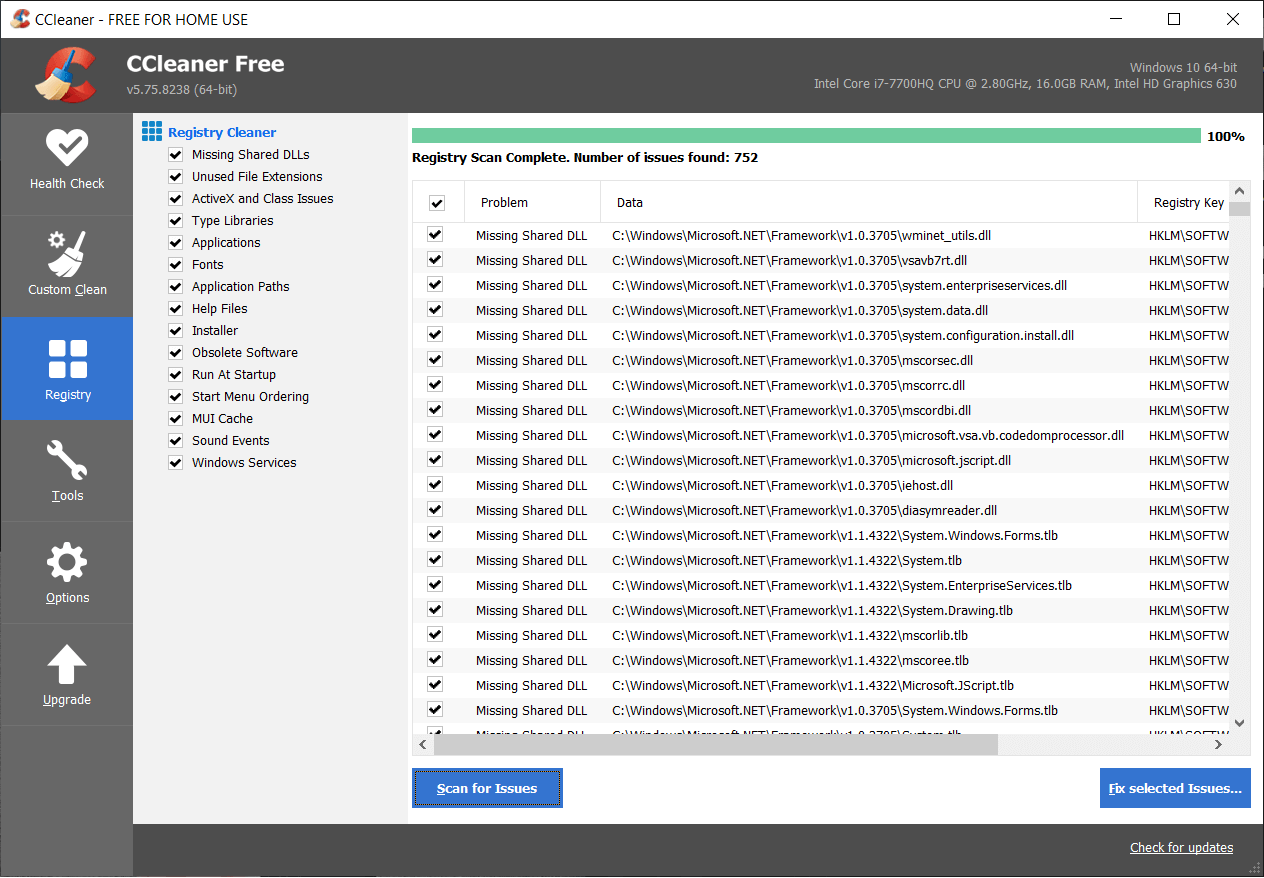
Method 9: Run CCleaner and Malwarebytes
Download and install CCleaner & Malwarebytes.
Run Malwarebytes and let it scan your system for harmful files. If malware is found it will automatically remove them.
Now run CCleaner and select Custom Clean.
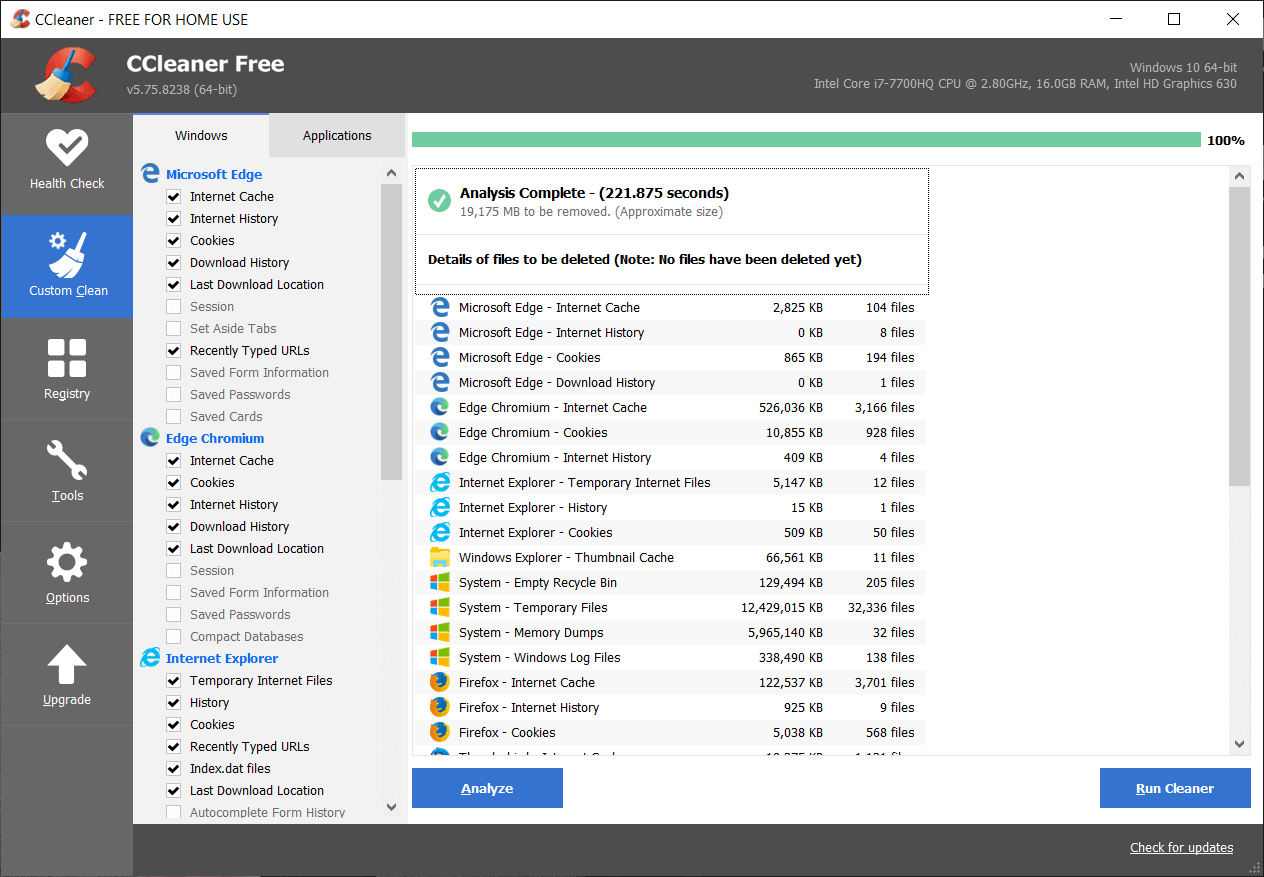
Under Custom Clean, select the Windows tab then make sure to checkmark defaults and click Analyze.
Once Analyze is complete, make sure you’re certain to remove the files to be deleted.
Finally, click on the Run Cleaner button and let CCleaner run its course.
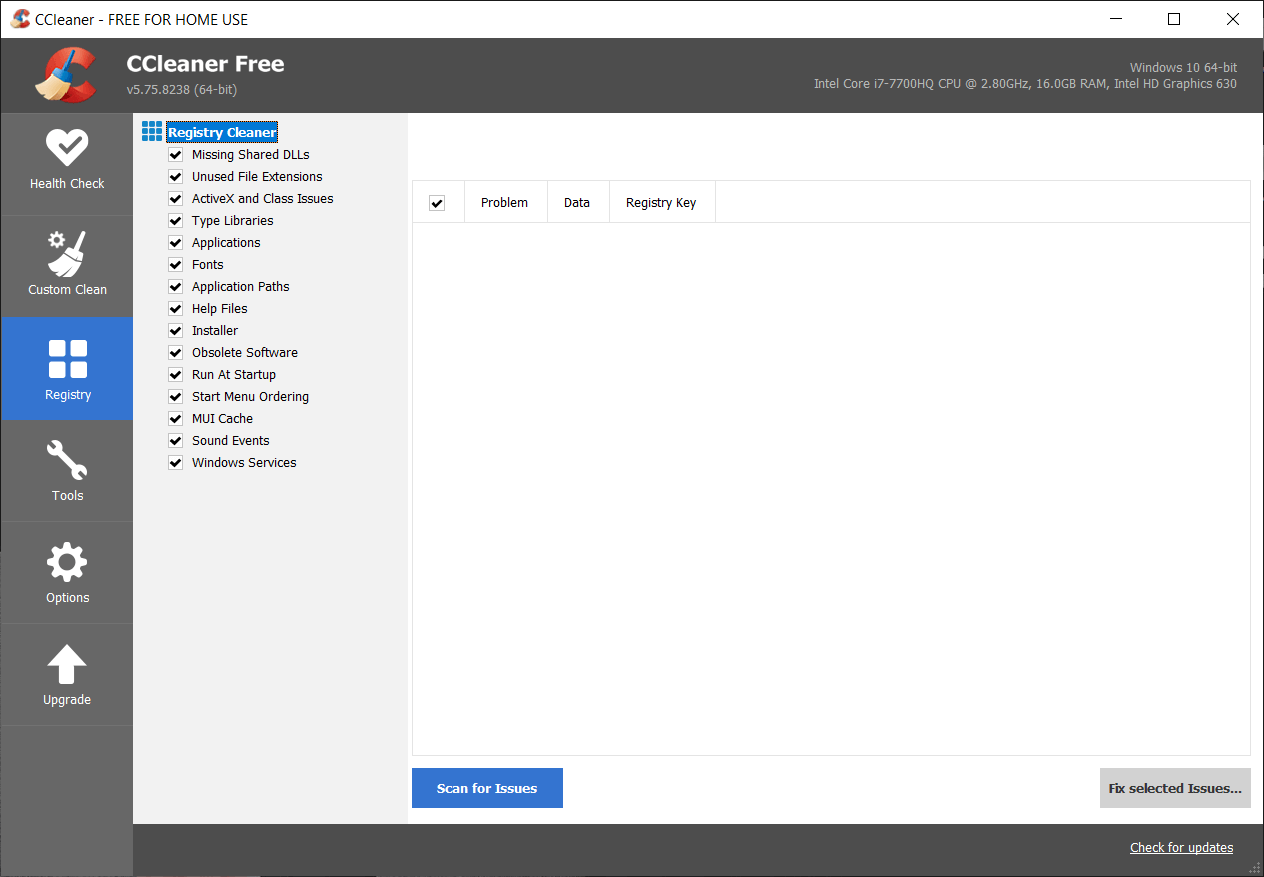
To further clean your system, select the Registry tab, and ensure the following are checked:
Click on the Scan for Issues button and allow CCleaner to scan, then click on the Fix Selected Issues button.
When CCleaner asks “Do you want backup changes to the registry?” select Yes.
Once your backup has completed, click on the Fix All Selected Issues button.
Restart your PC to save changes.
Method 10: Run Windows Memory Diagnostic
Type memory in the Windows search bar and select “Windows Memory Diagnostic.”
In the set of options displayed select “Restart now and check for problems.”
After which Windows will restart to check for possible RAM errors and will hopefully display the possible reasons as to why you are facing the Aw Snap error on Google Chrome.
Reboot your PC to save changes.
Method 11: Temporarily Disable Antivirus and Firewall
Sometimes the Antivirus program can cause Aw Snap error on Chrome while searching for harmful software and in order to verify this is not the case here, you need to disable your antivirus for a limited time so that you can check if the error still appears when the antivirus is off.
- Right-click on the Antivirus Program icon from the system tray and select Disable.
2. Next, select the time frame for which the Antivirus will remain disabled.
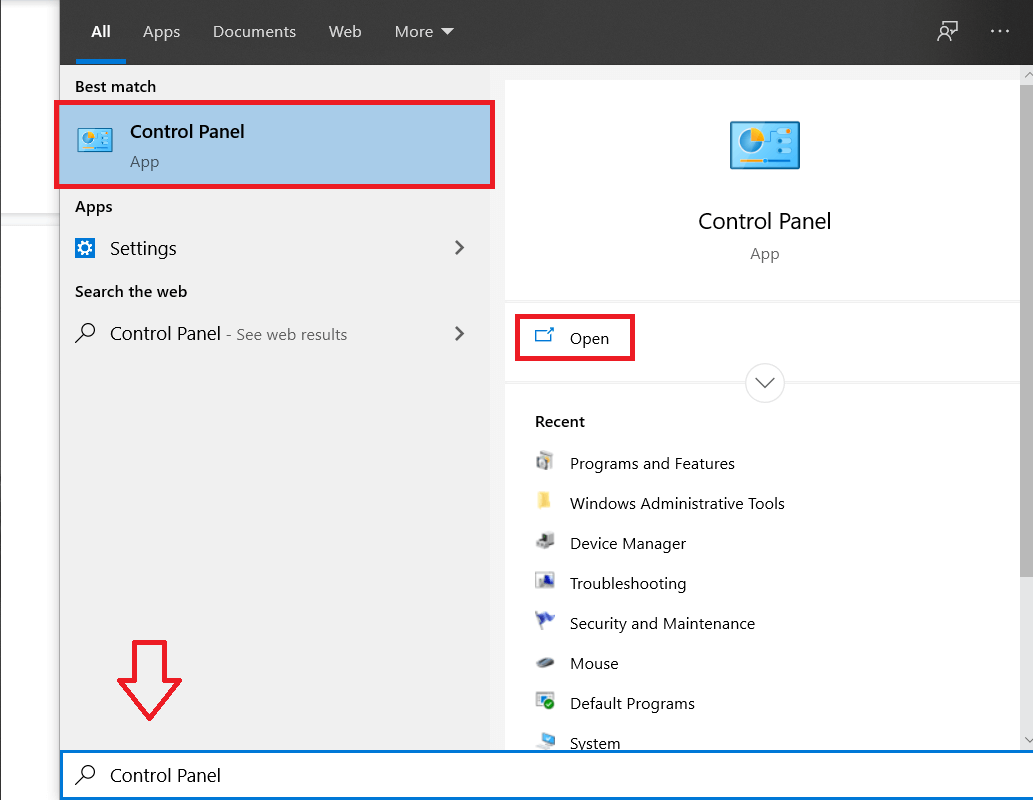
Note: Choose the smallest amount of time possible for example 15 minutes or 30 minutes. 3. Once done, again try to connect to open Google Chrome and check if the error resolves or not. 4. Search for the control panel from the Start Menu search bar and click on it to open the Control Panel.
Next, click on System and Security then click on Windows Firewall.
Now from the left window pane click on Turn Windows Firewall on or off.
Select Turn off Windows Firewall and restart your PC.
Again try to open Google Chrome and visit the web page which was earlier showing the Aw Snap error. If the above method doesn’t work make sure to follow the exact same steps to turn on your Firewall again.
Method 12: Use Google Chrome Offical Cleanup Tool
The official Google Chrome Cleanup Tool helps in scanning and removing software’s that may cause the problem with chrome such as crashes, unusual startup pages or toolbars, unexpected ads you can’t get rid of, or otherwise changing your browsing experience.
Method 13: Create a New User Profile for Chrome
Note: Make sure Chrome is completely closed if not end its process from Task Manager.
Press Windows Key + R then type the following and hit Enter: %USERPROFILE%\AppData\Local\Google\Chrome\User Data
Now back the Default folder to another location and then delete this folder.
This would delete all of your chrome user data, bookmarks, history, cookies, and cache.
Click on your user icon displayed at the top right corner next to the three vertical dots symbol.
Click on the small gear in line with Other people to open the Manage People window.
Click on the Add person button present at the bottom right of the window.
Type in a name for your new chrome profile and select an avatar for it. When you are done, click on Add.
Method 14: Disable Sandbox mode
Make sure that Chrome isn’t running, or open Task Manager and end the Google Chrome process.
Now find the Chrome shortcut on your desktop then right-click on it and select Properties.
Switch to the Shortcut tab and add –no-sandbox or -no-sandbox in the Target field after the quotes.
Note: Only add an empty space after quotes and then -no-sandbox at the end. 4. Click Apply followed by OK. 5. Again open Google Chrome from this shortcut and it will open with sandbox disabled.
Method 15: Reinstall Chrome
Finally, if none of the above-mentioned methods worked and you really need to fix Aw Snap Chrome Error, consider reinstalling the browser. Before you uninstall the application, be sure to sync your browsing data with your account.
Type Control Panel in the search bar and press enter when the search returns to launch the Control panel.
In Control Panel, click on Programs and Features.
Locate Google Chrome in the Programs and Features window and right-click on it. Select Uninstall.
4. A user account control pop-up asking for your confirmation will appear. Click on yes to confirm your action. 5. Restart your PC then again download the latest version of Google Chrome. Recommended for you:
Fix Windows Media Player cannot play the file Fix The properties for this item are not available How to Fix Windows File Explorer keeps refreshing itself Fix Credential Manager Error 0x80070057 The Parameter Is Incorrect
That’s it you have successfully Fix Aw Snap error on Google Chrome but if you still have any questions regarding this post then feel free to ask them in the comment section.


![]()


